Sunday, December 29, 2013

Peach Cobbler Muffins

Have I talked about how much I love peaches? They are right up there with lemons. I can't think of a better fruit than a ripe peach from a farmer's market. And oh those beautiful peachy colors! Peaches are so great, I wanted them in my wedding. I don't remember if I mentioned this before, but we had peach cobbler at our wedding instead of wedding cake. It was amazing, and made for a nice display. 


Anyways, I think I first made these muffins for a camping trip. They were a sweet, portable breakfast of sorts. I know this post is terribly out of season, but I figured we could use a little summer in the midst of this cold winter. 
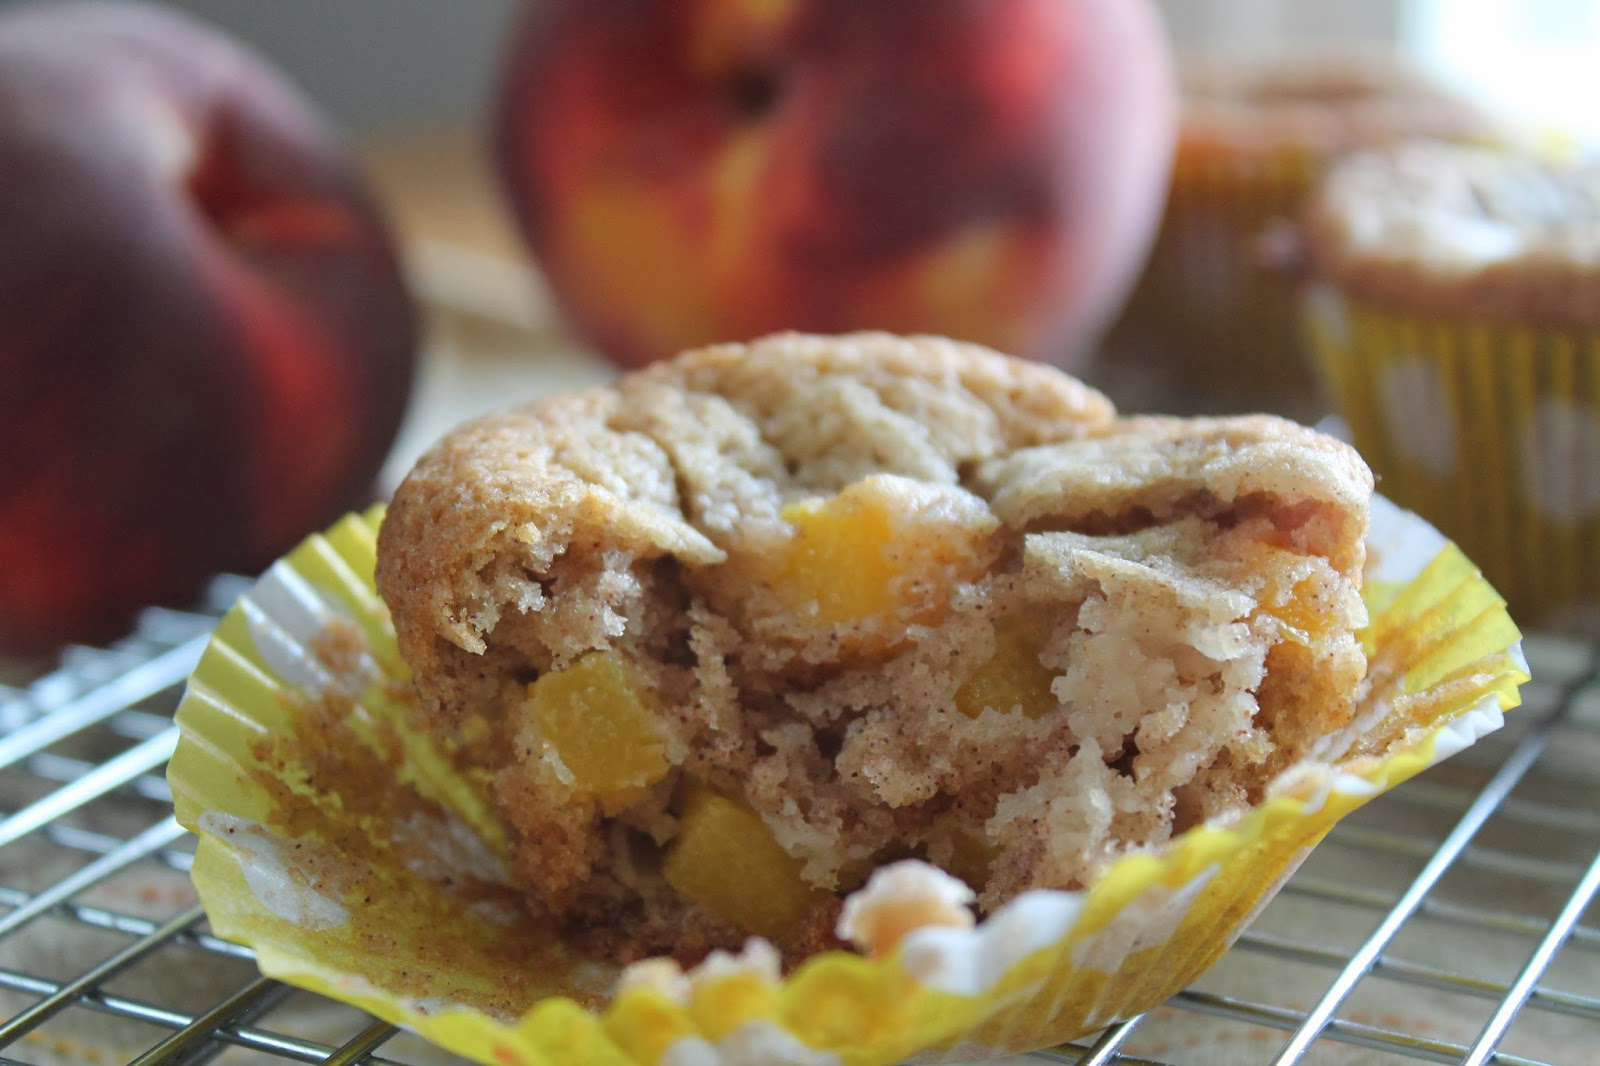
Peach Cobbler Muffins 
3 cups all-purpose flour
1 tablespoon ground cinnamon
1 teaspoon baking soda
1 teaspoon salt
1 1/4 cups vegetable oil
A dash of milk
3 eggs, lightly beaten
2 cups white sugar
2 cups peeled, pitted, and chopped peaches

1.      Preheat oven to 400 degrees F (200 degrees C). Lightly grease 16 muffin cups.
2.      In a large bowl, mix the flour, cinnamon, baking soda, and salt. In a separate bowl, mix the oil, milk, eggs, and sugar. Stir the oil mixture into the flour mixture just until moist. Fold in the peaches. Spoon into the prepared muffin cups.
3.      Bake 20-23 minutes in the preheated oven, until a toothpick inserted in the center of a muffin comes out clean. Cool 10 minutes before turning out onto wire racks to cool completely.


Thursday, November 28, 2013

Caramel Apple Pie Bars


I am not much of a cake fan. I mean, it's ok. And I will eat it. But given a choice, I would probably choose brownies, or ice cream, or cookies, or pie, or pretty much any another dessert. When I was little we had Pumpkin Pie for my birthday one year. And instead of a wedding cake, we had Dutch Oven Peach Cobbler. Last week was my birthday, and my mom made me these incredible Caramel Apple Pie bars while we were out for a visit. It's like an apple crisp but easy to eat, and even tastier.

The recipe takes a little while, but it is so worth it. Feel free to double any part of the recipe if you like more apples, more caramel or more crust.


Caramel Apple Bars

1 cup packed brown sugar
½ cup butter or margarine, softened
¼ cup shortening
1 ¾ cups all-purpose flour
1 ½ cups quick-cooking oats
1 teaspoon salt
½ teaspoon baking soda

4 1/2 cups coarsely chopped peeled tart apples (3 medium)
3 tablespoons all-purpose flour
1 bag (14 ounces) caramels
(I just made my own caramel sauce: ½ cup
evaporated milk, ½ cup brown sugar, ½ cup butter cook over medium-high
heat stirring constantly until the temperature reaches soft boil stage OR it is
yummy to double this!)

Directions

Heat oven to 400ºF. Mix brown sugar, butter and shortening in large bowl.
Stir in 1 3/4 cups flour, the oats, salt and baking soda. Reserve 2 cups oat
mixture; press remaining oat mixture in ungreased rectangular pan, 13x9x2
inches.
Toss apples and 3 tablespoons flour; spread over mixture in pan. Heat
caramels over low heat, stirring occasionally, until melted; pour evenly over
apples. Sprinkle with reserved oat mixture; press lightly.
Bake 25 to 30 minutes or until topping is golden brown and apples are
tender. Can be eaten warm with a fork, or chill and eat as a bar. Store covered in refrigerator.

Whole Wheat Kernel Buttermilk Pancakes in the Blender


These are pretty wonderful pancakes. My mom found the recipe just a little while ago and every time we come home to visit she makes them for us. There are only a few ingredients and making them in a blender means they take no time at all.

These pancakes work best if you have a high powered blender (my Blendtec is pretty much the most amazing thing ever), but I think they will be ok in a normal blender. 


Whole wheat kernals make these pancakes rich and almost nutty. I assume you can buy them at a grocery store, or at least a healthy food store. I stole mine from my mom.... so I am no help.


The recipe makes the batter quite thick, which I enjoy, but it does mean you have to spread the batter yourself with a spoon. If you don't want to worry about this and enjoy thinner pancakes, go ahead and add a little more buttermilk. 


Wheat Kernel Buttermilk Blender Pancakes


1 cup whole wheat kernels
1 1/2 cups buttermilk
1/2 tsp. salt

1 tsp. baking soda
1-2 Tbsp sugar
1/3 cup vegetable oil
1egg

Combine wheat kernels and buttermilk in blender. Blend on high for 60 seconds, until mixture is smooth. Add remaining ingredients and blend for an additional 30 seconds on high. Pour or scoop batter on to butter greased skillet. When small bubbles begin to form on pancake, flip over and cook for another 30 seconds. Serve warm with butter and syrup. 


Tuesday, November 5, 2013

Creamy White Chicken Chili


I made this chili for a big family gathering at a lovely cabin in the mountains. Chili is perfect cabin food, and this creamy chili is comforting and a little spicy and you can make it tangy with your lime wedges and crunchy with those chips. Delicious. 

Creamy White Chicken Chili

1 tsp olive oil
1 tsp fresh garlic
1/2  onion, diced
2 chicken breasts, grilled and diced (or 4 chicken thighs)
1-4oz green chili
1-4oz jalapenos
3- 15oz can of white beans, drained (Great Northern, White Navy, White Chili Beans)
1 can chicken broth 
1- 15 oz can green enchilada sauce
1 tsp ground cumin
1 tsp oregano
4 oz cream cheese (1/2 package) or 4 oz jar of sour cream
1/2 bunch chopped cilantro
lime wedges and tortilla chips for eating

Heat oil in large stock pot. Cook onions and garlic until translucent. Add green chilis and jalapenos. Cook until onions begin to brown. Add grilled chicken beans, broth, and all spices. Simmer 1 hour. 15 min before serving, stir in cream cheese/sour cream and cilantro. Serve with tortilla chips and lime wedges. 

Crock pot version: Throw everything in a crock pot and cook on low for 4-8 hours. Add cream cheese/sour cream, cilantro and stir until incorporated. Serve with lime wedges and tortilla chips. 
*Note: This version is super convenient and great for a busy day but you do lose depth of flavor by not grilling the meat and not sauteing the veggies. 

Instant Pot Version:
SAUTE Funtion: 
Add oil, garlic, onion, chilis and jalapenos. Saute until soft. Push to the sides, add chicken and brown on one or both sides. Remove chicken. Pour 1/2 can of chicken broth in pot and stir to deglaze pan. Insert steamer basket on top of broth and sauteed veggies. Place chicken on top of steamer basket. 
MANUAL Function:
For Chicken Breasts set for 5 min. Let it natural release for 5 min and then quick release. 
For Chicken Thighs set for 8 min. Let it natural release for 5 min and then quick release. 
Remove Chicken breasts and steamer basket. Dice Chicken breasts and return to pot. 
SOUP Function:
Add beans, chicken broth, enchilada sauce and spices. Set for 5 min. Let it natural release for 10 minutes and then quick release. Add cream cheese and close lid. I let it sit for a few minutes and then stir it in until melted. 
Right before serving, add chopped cilantro. Serve with lime wedges. 
*Note: This recipe will fit in a 6 Qt Instant Pot. If you want to double the recipe, you will need a larger Instant Pot, or you will need to transfer to a crock pot or stock pot when you add beans and broth. 

Saturday, August 3, 2013

Bacon Wrapped Jalapeno Poppers

These guys are one tasty treat. Salty bacon, sweet cream cheese, spicy jalapenos, crunchy breadcrumbs. It's a winning combo.


Easy Version:
Stuff cream cheese in hollowed out jalapenos. Wrap some bacon around it. Bake it. Yum


Fancy, Detailed Version:

Ingredients:
10 Jalapenos, tops chopped off and seeds hollowed out (to reduce heat)
1 8oz block of cream cheese
1/2 cup sharp cheddar cheese
3/4 cup Italian breadcrumbs
1 lb bacon, cut in to 1/2 strips
toothpicks to hold bacon on


Mix together cream cheese, cheddar and any salt and pepper if you want it. Spread mixture into hollow jalapenos, don't over stuff or it will ooze everywhere. 
Dip jalapeno cream cheese side down into a shallow dish of bread crumbs. Wrap 1/2 piece of bacon around jalapeno, covering as much as possible. Stick with a toothpick to make it all hold together. 
Bake at 375 for 15-20 minutes until bacon is cooked thoroughly, maybe even a little crispy. For extra delicious taste: cook on a smoker or a grill. 


Sunday, July 28, 2013

Creamy Parmesan Tilapia

According to "Women's Health Magazine" Tilapis is only the 14th healthiest fish to eat. Apparently they say Catfish is #12... So I don't know if I trust them. In any case, most people agree that fish in all forms is still pretty great for your heart and has omega 3s  and good stuff like that. Anyways, I use Tilapia because it is cheap. If you are feeling rich, go ahead and try this recipe with Salmon or Mahi Mahi.

I think I first saw this recipe on Pinterest. It was originally a recipe for chicken, and since it worked so well with the chicken, I thought I would give it a try with fish.

No pictures yet, I will put them up as soon as I make it again.

Ingredients:
4 Tilapia Fillets
1 cup Mayonnaise*
1 cup Parmesan Cheese
Dash of Garlic Salt
Dash of Pepper
3/4 cup Italian Breadcrumbs

Spray an 8X8 baking dish with cooking spray. Lay Tilapia in bottom of pan.
 In separate bowl, mix mayonnaise and Parmesan cheese. Spread mixture over the top of fish, covering fish completely. Sprinkle bread crumbs over cheese mixture and top with garlic salt and pepper to taste.
Bake at 400 degrees for  12-14 minutes, until breadcrumbs begin to brown and fish flakes easily.

*Substitute Plain Greek Yogurt for healthy dish

Wednesday, July 17, 2013

Stuffed Mushrooms

Stuffed Mushrooms are awesome, for people who love mushrooms and even for people who don't. Because they are delicious. And so very versatile! You can put all sorts of meats or vegetables in their depending on your personal preferences. So here it is, your guideline to making stuffed mushrooms.


Ingredients:
1 lb mushrooms, any kind. Washed and stems removed. Stems chopped and set aside.
8oz cream cheese
1/4 cup bread crumbs
1/4 cup cheese (parmesan, swiss, feta, havarti etc)
1/2 lb meat (sausage and bacon are wonderful choices)
1/4 onion, diced
1 tsp garlic
1 cup spinach, or kale or something similar, chopped
Optional: 1 tsp cayanne powder, 1/2 chopped jalapeno for heat

In a large bowl combine cream cheese, bread crumbs and other cheese (using a hand mixer might be good).
Cook meat until done, add garlic and onions until soft.
Add hot meat, spinach and any spices to cream cheese mixture and mix thoroughly.
Spoon mixture into mushroom caps and mold into dome.
Sprinkle with cheese.
Bake mushroom caps at 400 degrees face up until juices pool beneath mushrooms, about 12-14 minutes.

Saturday, March 23, 2013

Spinach and Cheese Stuffed Shells


I make menu plans every week, to help me grocery shop and be somewhat organized for the week. But I usually only follow it for a few of the days. We get invited over to eat with family, I get lazy, I forget to buy a key ingredient, life happens. So I just push whatever meals I missed to the next week. These stuffed shells have been on my list for a while, and I have been pretty excited to try them out. They were tasty, got good feedback and I would make them again with a few changes that I have included below.


Veggies and cheese get blended to look like a green smoothie!

That green smoothie looking mixture gets stuffed into al dante jumbo shells

And placed face down into a puddle of marinara sauce

Top with more marinara, add some cheese and cook until bubbly

Yum!

20-25 jumbo shells, cooked al dente

Filling:
1 cup spinach or kale, chopped
1 cup cottage cheese (or ricotta- I just don't keep that around)
1/2 cup parmesan cheese
1/4 cup italian style bread crumbs (optional, it just gives it more substance)
1 egg
1 tsp sea salt
1 tsp pepper
1 tsp parsley
1 tsp italian seasoning
1/4 mozarella cheese

Sauce:
2 cups seasoned marinara sauce
1 cup shredded veggies (zucchini, yellow squash, mushrooms, carrots, or a combination)
1 Tbsp Italian seasoning

1/2 cup mozzarella cheese (for the top

Mix all sauce ingredients together. Pour 1 cup sauce into 9X13 pan, set aside. In a blender, combine all filling ingredients except mozzarella cheese. Blend until combined, add an extra egg if it is too thick to blend. Mix in mozzarella cheese with a spoon.  Spoon green mixture into shells and close a little before placing face down into pan. Cover shells with remaining sauce. Sprinkle mozzarella cheese over shells and place in preheated oven. Cook at 375 degrees for 30-35 minutes or until cheese on top is bubbling. 

Thursday, March 14, 2013

Brown Rice Enchiladas with a Black Bean Sauce

So remember my awesome friends who I grew up with? The ones who gave me the best salsa recipe ever and the delicious Black Bean Soup? Well I have yet another wonderful recipe from them. And I don't know the official nutrition facts on this recipe, but I am willing to assume it is at least kind of healthy because everything the Collet's make is healthy.

I made these as part of our "Vegetarian Project" and they got very positive reviews from the boys. A quote from one of them: " I can't believe these don't have meat in them, they taste so good". That is a huge deal, in case you didn't know.

They take a little bit of prep work and a little bit of time, but they are delicious. My only regret is that the pictures didn't turn out any better... Oh well, make them yourself and you can take a better picture for me to use.


RICE ENCHILADAS W/ BLACK BEAN SAUCE
Sauce:
1 can green chiles                                           
1 can black beans, undrained
1 can vegetable broth                    
 ½ c chopped onion
2 cloves garlic                                      
1 bay leaf
3 Tbsp hot sauce

Combine in saucepan and bring to boil. Reduce to a simmer and let simmer 5 minutes. Pour mixture into blender (taking care because it is hot) and process until smooth. Set aside.

Filling:
1 c cottage cheese  
½ c sour cream
½ c feta cheese
Blend in blender.  Then stir in:
¼ c onion                         
1 chopped seeded jalapeno
2 c cooked, brown rice
2 Tbsp hot sauce (optional)

To make:
6 Flour tortillas
¾ cup Monterrey Jack Cheese
Chopped cilantro, to taste

Fill 6 flour tortillas (or 10 corn tortillas) with rice/cheese mixture, roll and place in 9 X 13 dish coated with cooking spray.  Pour about half of the black bean sauce over tortillas; cover and bake at 350 for 25 min.
Uncover, sprinkle with Monterrey Jack cheese.  Bake 5 more minutes or until cheese is bubbling.

Serve warm with cilantro for topping and the rest of the black bean sauce for pouring on top. 


Sunday, March 10, 2013

Peanut Butter Bars


I have never been a huge PB bar fan. I mean, they were fine. Just not my favorite. But this recipe converted me. My mother in law made these a couple weeks ago and I think I ate half the pan. I asked for the recipe to use in a cooking group at my work and have made it twice this week now. I learned some valuable things each time I made them. I will share my mistakes with you so that yours are fabulous. 


Mistake #1. Cool the peanut butter bars completely before frosting. Not just not hot. They guys should be cold if possible. Stick it in the fridge or freezer for an hour kind of cold. Otherwise you will get a melted peanut buttery mess. 

Mistake #2 Use smooth peanut butter. I guess if you really love the crunchy variety you can try that. But I really think it messes with the consistency of the bar. Just keep it smooth. The bars pictured here have crunchy PB, but again, I recommend the smooth. 

Mistake #3 Do not overcook! This was even written on the recipe and I still messed up! They seem too underdone after 13 or so minutes and I thought another 5 minutes would just firm them up a bit. Which it did... but it also majorly dried them out. I wouldn't let anyone eat the edges because they were so crumbly and dry. They bars are meant to be so soft and melt in your mouth. So really, don't go over 15 minutes. 


Kayla's Fabulous Peanutbutter Bars
1 ½ cups brown sugar
1 cup white sugar
1 ½ cups softened butter
4 eggs
1 Tbsp vanilla
1 cup smooth peanut butter
1 ½ tsp. baking soda
2/3 tsp. salt
3 cups flour
3 cups rolled oats

In a mixing bowl, cream sugars and butter until fluffy. Add eggs, vanilla and peanut butter, mix until smooth. Add baking soda, salt, flour and oats and mix until totally incorporated. Spread on greased cookie sheet. Bake at 350 for 11-15 minutes. Don’t overbake! They should be barely browned on top. These are meant to be very soft. Let cool completely. Smooth 1/2 cup to 1 cup peanut butter over bars. Spread chocolate frosting on top of peanut butter and enjoy!

Chocolate Frosting
2 ½ cups powdered sugar
¼ tsp salt
¼ cup dry cocoa

1/4 cup white sugar
2 Tbsp water
1 egg
1/2 cup soft butter

Put first three ingredients in a mixer (I love my Bosch). Put ¼ cup of granulated white sugar in mug. Add 2 TB water, and microwave for 60 seconds, until the sugar is fully dissolved and you have a thick syrup. Now timing is everything. Turn on the Bosch, and quickly break one egg into the spinning powdery mess. Quickly pour in the hot syrup. Then throw in a cube (1/2 cup) butter. Then pour in 1 tsp vanilla. Scrape down the sides of the bowl, and whip until creamy and blended. Spread over peanutbutter bars for a yummy treat! 

Sunday, March 3, 2013

Banana Cream Pie Crepes

I love random holidays. Especially the ones involving food. It's like your week's menu was planned out for you by the universe. I mean, once you know March 2nd is Banana Cream Pie Day, how can you not make a Banana Cream Pie?


Except I didn't feel like making a pie crust. So I got creative and made these Banana Cream Pie Crepes. Pretty genius, I know. They were a big hit with the boys (no surprise there when you serve dessert for breakfast). 

And they are super easy. Crepe, sliced banana, vanilla pudding, whipped cream. 


Here is the crepe recipe I used. I liked it. I don't know if it is the very best one out there, but it worked. 

1 cup flour
2 eggs
¾ cup milk
½ cup water
¼ tsp salt
½ tsp vanilla
2 Tbsp melted butter

Combine all wet ingredients, except butter. Sift in flour and salt and whisk until smooth. Add butter.
Heat a lightly oiled griddle or frying pan over medium high heat. Pour or scoop the batter onto the griddle, using approximately 1/4 cup for each crepe. Tilt the pan with a circular motion so that the batter coats the surface evenly.
Cook the crepe for about 2 minutes, until the bottom is light brown. Loosen with a spatula, turn and cook the other side. Enjoy with any variety of toppings. 


Wednesday, February 6, 2013

Buffalo Chicken Dip

I really like hot wings. Not the burn your stomach, can't breath or taste for the next day, send you to the emergency room type hot wings.Those are just silly. But I like a nice, spicy wing that makes my mouth burn for a bit but still has good flavor. My favorite place to go for these perfect wings is Jim's Wings in Ft Collins. We learned a few years ago from a secret source that they use Frank's Ret Hot Sauce for their wings and ever since then, that is the only sauce I use. Frank's website has a great Buffalo Chicken Dip that I decided to try as part of our Superbowl menu. It turned out fantastic.


Buffalo Chicken Dip
adapted from Frank's Red Hot

8oz package cream cheese, softened
1 cup sour cream
1/2 cup ranch dressing
1 cup mozzarella cheese
1/2 cup to 1 cup Frank's Red Hot Sauce (depending on how spicy you want it)
1 chicken breast, cooked and shredded


Combine all ingredients in saucepan and cook until heated through and cheese is melted.
Or
Combine all ingredients in large bowl and mix well. Pour into casserole dish or pan and bake at 350 for 30 minutes.

Serve warm with celery stick and chips.


Monday, February 4, 2013

Jello Pretzel Salad

I never understood how jello could fall into the "Salad" category. Salads are made with leafy greens, or if you are extra cool they are made out of fruit. But jello? Come on.


Nonetheless, this recipe is most commonly known as the "Jello Pretzel Salad" and it is delicious. I shall also have you know this is the first time I have ever bought Cool Whip. I grew up in a house where everything was "real" and fake things (margarine, cool whip, spray cheese and the like) were not allowed in. So I had quite the moral dilemma at the grocery store trying to decide if this recipe could use real whipped cream. As I was making the dish for a dinner party, I decided not to risk it. If anyone has tried using real whipped cream, please, let me know your results. While the dish turned out delicious and was a big hit, I think it could be even better, so check out some of the notes at the end.


Jello Pretzel Salad

Crust:
2 cups crushed pretzels ( blended in blender until desired consistency)
3 T brown sugar
3/4 cup melted butter
Combine all ingredients and press into 9x13 pan. Bake at 350 for 10 min. Let cool.

Cream Filling:
8oz cream cheese (soft)
8oz Cool Whip
1/4 cup honey - see I am being healthy
Whip together and spread over cooled crust, being sure to get it all the way to each edge (to protect the crust from the jello).

Jello:
2 packets (3oz each) of jello (raspberry or strawberry)
1 bag frozen fruit- sliced strawberries or rasperries (optional)
Make jello according to directions, adding fruit at the end. Let jello cool slightly in the fridge, until it has thickened to the consistency of egg whites. Pour over cream filling and let entire pan set in fridge for 4 hours.

NOTES:
1. Ok, those crust amounts make a whole lot of crust, which is great if you are into that kind of thing. If you are not a crunchy lover or like a little less crust, it would be ok to half it.

2. I loved that cream filling. I think I might try doubling it next time.

3. Add the fruit. I didn't when I made this one because I didn't have any, but I think it would have made it extra delicious.


Tuesday, January 29, 2013

Thin Mint Cupcakes

Chocolate and mint are such a great combination. Peppermint patties = awesome. Mint Hot Chocolate = delicious. Thin Mints = wonderful. See, you can't go wrong. And these cupcakes are here to prove it.


Mint Chocolate Cupcakes with Chocolate Mint Buttercream

For the cake:
3/4 cup flour (heaping)
1 cup sugar
1/4 cup cocoa
1 tsp baking soda
1/2 tsp baking powder
1/2 tsp salt
1/2 cup buttermilk
1/4 cup vegetable oil
1 egg
1/4 tsp vanilla
1/2 tsp mint extract
1 cup boiling hot chocolate (we used mint flavored)

For the frosting:
1/4 cup shortening
1/4 cup butter (just softened)
2 cups powdered sugar
1 Tbsp heavy whipping cream (or milk)
1/2 tsp vanilla
1 tsp mint extract (add more or less depending on how strong you want the minty flavor)
1 1/2 Tbsp cocoa

4 Thin Mints or Grasshopper Cookies (for crumbling)

Preheat oven to 350 degrees F. Line muffin tin with paper baking liners. Do not attempt to bake straight in pan, this cake will stick.

Sift together dry ingredients in electric mixer. In separate bowl, combine wet ingredients EXCEPT hot cocoa. Slowly stir wet ingredients into dry until just combined. Add boiling hot cocoa slowly until batter is uniform and very runny. Don't worry, it will bake just fine. Spoon batter into prepared muffin tins, filling 3/4 full. Do not overfill, they will make a mess in the oven.

Bake for 35 to 40 min until toothpick inserted comes out dry. Remove from pans and let cool on cooling rack.

For frosting: combine shortening and butter in electric mixer and whip until light and fully. Alternate adding milk and sugar until frosting is fluffy and slightly stiff. Add cocoa, vanilla and mint extract. Mix thoroughly. Spoon into pastry bag and frost cooled cupcakes. Crumble cookies until they are a rough powder and sprinkle on top.

Enjoy!

Wednesday, January 23, 2013

Happy Pie Day!

At work yesterday I was looking up some January and February Holidays to celebrate. Sometimes it is fun to celebrate those little holidays that no one know about. Like that January is National Soup Month. That is why I was posting all those soup recipes for you.
... Ok fine, I learned about National Soup Month after the fact. But it was still a good idea.

Anyways, I learned in the nick of time that today is National Pie Day! Like an actual pie, not Pi (3.141592653) Day, another day where people often eat pie to celebrate. My husband asked forever ago if I would make Chicken Pot Pie and I never got around to it. Thankfully he is forgiving and this recipe is delicious. 


Extra Flaky Pie Crust 
2 cups sifted cold flour

1 teaspoon salt

1 teaspoon sugar

1/2 teaspoon vinegar (to make crust flaky)

2/3 cup butter

6 tablespoons ice water


Sift flour, sugar and salt together.  Grate cold butter (on cheese grater) into flour/salt and add vinegar. I grate the butter so that I don't have to cut it in with a pastry fork. Mix butter and flour together gently with hands until a crumbly mixture has formed. Add ice water 1 tablespoon at a time while mixing with hands until a ball is formed. Dough should be pliable and hold together but not wet at all. Adding too little water will cause the dough to crack when rolling, and adding to much water will make the dough sticky.  Split in half and roll out both halves on floured surface, then put one half in pie plate.


Chicken Filling

4 oz sour cream (1/2 cup)

1 Tablespoon milk (optional to make it smooth)

½ cup grated sharp cheddar cheese

1 can cream of chicken soup
1/2 cup cooked veggies ( my mom always used steamed broccoli pieces, and I like to add peas, corn and chopped carrots, just make sure they are not too wet when they go in the bowl)
1-2 chicken breasts, grilled and chopped into bite size pieces
A dash of garlic salt and a couple dashes of pepper to taste. 

Mix all ingredients together. Fill crust in the pie plate with filling and then cover with the other pie crust. Pinch sides together to seal. Brush evaporated milk on top of crust before baking for a golden brown crust. Bake at 400 degrees for 45-60 minutes.


Thursday, January 17, 2013

Black Bean Soup


I love posting recipes because I  try to remember where I got them and what memories are associated with them. A lot of my food memories involve my two best friends who were sisters. I guess we did a lot of eating together. 
This soup recipe is one of their's and reminds me of "staying for dinner" at their house. They always had a fruit salad at dinner, which was awesome because I thought fruit salad was dessert. I still remember their vinyl tablecloth and dishware. I was so sad when they moved my senior year of high school, and so happy when we became roommates in college. I still call and ask them for recipes of dishes I remember having at their house. This is one of my favorites. It is so quick and easy and super tasty. 

Black Bean Soup
Collet Family

1 c salsa 
2 (15 ½ oz) cans black beans, drained and rinsed
1 can chicken broth
1 t lime juice
2 T chopped fresh cilantro
Sour cream to garnish
Tortilla chips


Heat salsa over medium heat, stirring often, for 5 min. Stir in beans and broth. Boil, then lower and simmer for 15 minutes.
Ladle half of the soup into blender and puree. Return pureed soup to pot. Stir in lime juice & cilantro just before serving. Serve soup warm w/ dollop of sour cream. Eat w/ tortilla chips. Makes 4 servings.


Tuesday, January 15, 2013

Tortilla Soup


My friend and I had this tradition in high school. We called it Tortilla Soup and Secrets. We would eat tortilla soup from the night before on my bed and talk. And that was all, and it was awesome. 


This soup is awesome. It is tasty and easily adaptable. You can substitute low sodium, or low fat ingredients if you want. Or just enjoy it in it's full fat glory. Don't worry, it's still healthy.

Tortilla Soup
From the kitchen of Fern Woodbury


In a large pot, combine the following:
4 cups chicken broth
1 cup cooked chicken, cubed or shredded
1 can Rotel tomatoes
2 cans (16oz each) whole peeled tomatoes, blended until pureed
1 tsp cumin
1 tsp chili powder
1/2 tsp garlic

Bring to a boil and then reduce heat to a simmer for 20 to 30 minutes. Garnish with toppings and enjoy,

Optional Toppings:
Cheese- cheddar, monterrey jack, pepper jack, colby
Sour Cream
Avocado
Tortilla Chips
Salt to taste